Whether you’re a photography beginner or an old pro, there are always new things to learn. From photography composition hacks to camera settings, there are many techniques you can use to improve your photos.
For example, the Rule of Thirds is a simple but effective way to compose your shots. You can also practice symmetry or use leading lines for more impact.
Composition
The composition of a photo has an enormous bearing on the way it’s perceived, both at a visual and an emotional level. It is shaped by many different factors, from the positioning of the subject to the use of colour. A good understanding of composition can make your photos more effective and impactful.
There are no unbreakable rules when it comes to photography composition, but some guidelines can help you improve your shots. They are best seen as points of departure rather than as rigid ideals that risk stifling your creativity.
A great starting point is the rule of thirds. This composition technique splits the frame into a noughts and crosses board of two horizontal and vertical lines, with the subject placed at one of those intersections. Getting into the habit of using this guideline will open up a whole new world of possibilities for your photography.
Leading lines are another useful composition technique. These literal or implied lines create a path for your viewer’s gaze to follow, drawing them towards the subject and creating a sense of movement within the image. They can be straight, curved or angular and can add a lot of interest to your photographs.
Framing and the placement of elements in a scene are also important aspects of photography composition. For example, a well-placed foreground object can balance out a sky that might otherwise be too flat. Likewise, if you are taking a portrait of a person, try to find ways to isolate them within the frame. This will give them a much stronger presence and will make them feel more powerful.
Lastly, don’t be afraid to experiment with composition by shifting your angle of view. Getting up high or down low can reveal leading lines that would otherwise be hidden and can give your images a fresh perspective. By applying these simple techniques you will see a big improvement in your photographs. Remember that it takes practice to learn these tips and develop a natural feel for them, but with time you’ll start to instinctively know which rules to follow and which ones to break!
Lighting
Getting started with photography or improving your photo quality may feel daunting. But there are many simple tips and techniques you can apply to your next photo, from framing to editing to camera settings, that can make all the difference.
Lighting is one of the most important aspects of photography, especially for beginner photographers. Using the right light can create a mood, and it can also improve a subject’s texture, color and shape. Avoid harsh shadows that can obscure a subject’s features, and seek soft light that is diffused and warm. The best light is typically natural, either early in the morning or just before sunset, during times known as the golden hour.
Another way to use lighting is to frame your subject using natural or architectural elements, such as doors, walls, cliffs and arches. This technique is particularly effective for a landscape photograph, but can be used in portraits to draw the viewer’s attention to a specific feature or expression.
Experimenting with perspective is another way to bring more creativity into a composition. Even a well-known scene can look completely different when photographed from a new angle. Try crouching down to your subject’s level or standing on a bench to get their eye level, or take a step back to see how the landscape or building looks from above.
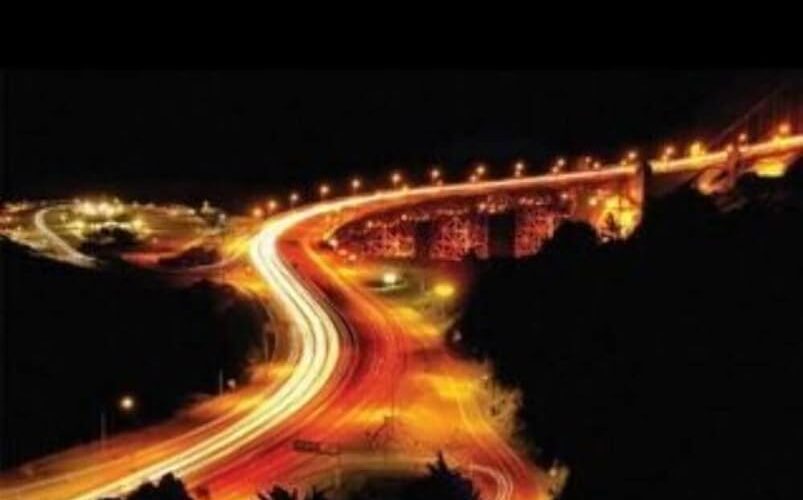
You can also create interesting lighting effects by taking photos in low light or using long exposures. Traffic light trails, for example, are a fun, easy-to-try photography technique that requires a dark location and a slow shutter speed to blur the motion of passing cars.
It’s also a good idea to practice with your camera in manual mode rather than auto, so you can learn what the different camera settings do and how to adjust them manually when needed. Leaving the camera in auto mode will only limit your ability to take great pictures. And remember to review your old photographs, even the ones that weren’t successful – learning from our mistakes is the only way to grow as a photographer! You’ll find that some old, unused photos can have unexpected qualities when taken again with better equipment or new knowledge of lighting and composition.
Camera Settings
The camera settings that you choose to use will make or break your photos. They are the most powerful tools available to you, yet they can be the most difficult to master. Understanding how they work together is an essential first step in gaining the confidence to manipulate them as you see fit.
The three main camera settings to know are aperture, shutter speed, and ISO. These are sometimes referred to as the exposure triangle, and they are responsible for exposing your photo’s sensor to light when you press the shutter button. Aperture determines how much light gets through to the sensor, and it can be used to manipulate depth of field. Shutter speed controls how long the camera is exposed to light, and it can be used to freeze motion or create blur (intentionally or not). ISO adjusts the sensor’s sensitivity to light, and it can be used to control exposure in very challenging situations that might confuse your camera’s automatic exposure system.
Another important camera setting to understand is white balance. Also known as picture styles, creative styles, or image controls, this setting can affect the overall look of your photo. It is often used to remove color casts from a scene, but it can also be useful in making your colors more vibrant. The default white balance setting on most cameras is auto, and while it usually works well in most circumstances, it can cause unwanted blue or yellow tinting in portraits and landscapes.
Finally, your camera’s photo space settings can be used to control how colors are displayed on different devices and browsers. The most common photo space is sRGB, and while it doesn’t include all the colors your camera can record, it’s usually the best option for consistency across devices.
Another camera setting that many photographers find helpful is image stabilization, which helps to reduce blur when shooting handheld at slower shutter speeds. You can find this setting in your camera’s menu or by pressing one of the customized buttons on the camera’s body. It is usually recommended that you turn this on if you are shooting in manual mode or any of the semi-automatic modes (Aperture-priority, Shutter-priority, or Program). However, if you have good hand-holding technique, it may not be necessary to use this feature.
Post-processing
While this gets less attention than it should, photography post-processing is a big part of being a good photographer. You can’t avoid it, and there are a lot of things that you can do in post to make your images look better. This includes a lot of the basic stuff, like cropping, correcting colors and exposure, making your images look sharper, etc. It also includes more creative stuff, like adding texture or using filters to give your image a certain look.
The important thing to remember about post-processing is that it is only a tool and not a replacement for getting your composition, lighting, and camera settings right in the first place. Most of the time, the difference between a great photo and a good one is small things like straightening out the horizon line or adjusting a color balance. That’s why you should spend most of your time learning about the other aspects of photography, and only use post-processing to tweak a few things here and there.
Some more advanced photography post processing techniques include things like adjusting the dynamic range of an image (i.e. the amount of light and dark). This can help to bring out details in the shadows or highlights that your camera may have missed, or it can be used to create a more dramatic effect. For example, you can use the dynamic range slider to make a sunset or sunrise look more dramatic by brightening up the dark areas and reducing the highlights.
Another interesting photography post-processing technique is cloning, which allows you to remove things from a photograph. This can be as simple as a speck of dust or as complex as someone’s feet that are in the way of your subject. Many people also use cloning to create composites, where they take multiple images and then edit them together to create something that wouldn’t be possible in real life.
Some other common photography post-processing techniques are things like reducing the noise in an image, and using curves to adjust the brightness of an image. There are a lot of things that can be done in post, and it’s important to learn as much as you can about them. However, if you can understand the basics of photography, then you can start to figure out how to get the most out of your camera and create some amazing shots.